本日、Firefoxのガイドをお届けします。誰でもナビゲーションツールバーにカスタムボタンを作成できます。ナビゲーションツールバーの表示ボタンに加えて、Firefoxで提供されるさまざまな機能を持つ他のボタンのリストがあり、ツールバーのどこにでも追加でき、ニーズに応じてカスタマイズできます。追加の知識を必要とせずにボタンの位置と動作を変更できるため、指示どおりに動作し、定義された位置に配置され、高度にカスタマイズ可能な新しい拡張機能を簡単に構築できます。この投稿では、シンプルな拡張機能、つまりシンプルな機能を提供するツールバーボタンを作成する方法について説明します。
始めるには、まず調べる必要があります 拡張機能 フォルダー(Firefoxのプロファイルフォルダーにあるフォルダー)。 Windows 7およびWindows Vistaユーザーは、このフォルダーをここで見つけることができます。
C:Users <<ユーザー名>> AppDataRoamingMozillaFirefoxProfiles <<プロファイル名>> extensions
ただし、Windows XPを使用している場合は、次のように入力します %アプリデータ% WindowsのRunコンソールでEnterキーを押します。
Firefoxフォルダーを開いてから、プロファイル-> <プロファイル名>->拡張フォルダー
一度 拡張機能 フォルダーが開かれ、次の名前で新しいフォルダーを作成します [email protected] 初期化。

新しく作成したフォルダーを開き、新しいディレクトリを作成します クロム, 2つのファイルとともに- chrome.manifest そして install.rdf. 次に、これらのファイルをテキストエディターで編集します。Windowsビルドインメモ帳など、utf-8をサポートするエディターを使用することをお勧めします。
まず、開いて chrome.manifest ファイルを作成し、次のコード行を初期化します。 以下に示すコードは、Thunderbirdのメール、作成、アドレス帳ウィンドウ、およびSunbirdでも機能します。ただし、Firefoxでのみボタンを使用する必要がある場合は、ThunderbirdおよびSunbirdのコード行を除外できます。
content custombutton chrome/
style chrome://global/content/customizeToolbar.xul chrome://custombutton/content/button.css
# Firefox
overlay    chrome://browser/content/browser.xul chrome://custombutton/content/button.xul
# Thunderbird mail
overlay    chrome://messenger/content/messenger.xul chrome://custombutton/content/button.xul
# Thunderbird compose
overlay    chrome://messenger/content/messengercompose/messengercompose.xul chrome://custombutton/content/button.xul
# Thunderbird address book
overlay    chrome://messenger/content/addressbook/addressbook.xul chrome://custombutton/content/button.xul
# Sunbird
overlay    chrome://calendar/content/calendar.xul chrome://custombutton/content/button.xul
ファイルにコードを挿入したら、変更を保存してから閉じます。編集する install.rdf ファイル、次のコード行を挿入する必要があります初期化。ボタンの一般的な説明を変更したり、コードの6、7、8行目にテキストを追加したり(二重引用符で囲む必要があります)、ボタンの名前、説明テキスト、作成者名を入力できます。
<?xml version="1.0"?>
<RDF xmlns="http://www.w3.org/1999/02/22-rdf-syntax-ns#"
xmlns:em="http://www.mozilla.org/2004/em-rdf#">
<Description about="urn:mozilla:install-manifest"
em:name="AT"
em:description="AddictiveTips"
em:creator="Usman"
em:id="[email protected]"
em:version="1.0"
em:homepageURL="http://developer.mozilla.org/en/docs/Custom_Toolbar_Button"
em:iconURL="chrome://custombutton/content/icon.jpg" >
<em:targetApplication><!-- Firefox -->
<Description
em:id="{ec8030f7-c20a-464f-9b0e-13a3a9e97384}"
em:minVersion="1.4"
em:maxVersion="99" />
</em:targetApplication>
<em:targetApplication><!-- Thunderbird -->
<Description
em:id="{3550f703-e582-4d05-9a08-453d09bdfdc6}"
em:minVersion="1.4"
em:maxVersion="99" />
</em:targetApplication>
<em:targetApplication><!-- Sunbird -->
<Description
em:id="{718e30fb-e89b-41dd-9da7-e25a45638b28}"
em:minVersion="0.2.9"
em:maxVersion="99" />
</em:targetApplication>
<em:file>
<Description
about="urn:mozilla:extension:custombutton"
em:package="content/custombutton/" />
</em:file>
</Description>
</RDF>
説明を変更したら、変更を保存してファイルを閉じます。新しく作成したフォルダーを覚えておいてください(クロム)、3つのファイルを作成し、2つの画像を挿入します。最初に、次の名前を持つ3つのファイルを作成します。
- button.css
- button.xul
- button.js
次に、ボタンにスタイリングを適用します。ここでは何も複雑ではありません。ボタンのデザインに基本的なスタイリングを適用します(ボタンの画像サイズとホバー効果を定義します)。 CSSファイル(Cascading Style Sheet)の設計に精通している場合、値と効果の変更は簡単ですが、その名前を初めて聞いた場合は、次のスタイルのコード行を挿入してください。 button.css ファイルを作成したら、変更を保存して閉じます。
#custom-button-1,
#wrapper-custom-button-1
{list-style-image: url("chrome://custombutton/content/button-1.jpg");}
/* common style for all custom buttons */
.custombutton                    {-moz-image-region: rect( 0px 24px 24px  0px);}
.custombutton:hover       {-moz-image-region: rect(24px 24px 48px  0px);}
[iconsize="small"] .custombutton
{-moz-image-region: rect( 0px 40px 16px 24px);}
[iconsize="small"] .custombutton:hover
{-moz-image-region: rect(24px 40px 40px 24px);}
今開いて button.xul テキストエディターでファイルし、次の行を挿入しますコードの。 ThunderbirdとSunbirdのコードも提供していることを忘れないでください。Firefoxのみについてこのガイドに従っている場合は、ThunderbirdとSunbirdに関連する行を除外できます。
<?xml version="1.0" encoding="utf-8"?>
<?xml-stylesheet type="text/css"
href="chrome://custombutton/content/button.css"?>
<!DOCTYPE overlay >
<overlay id="custombutton-overlay"
xmlns="http://www.mozilla.org/keymaster/gatekeeper/there.is.only.xul">
<script type="application/javascript"
src="chrome://custombutton/content/button.js"/>
<!-- Firefox -->
<toolbarpalette id="BrowserToolbarPalette">
<toolbarbutton id="custom-button-1"/>
</toolbarpalette>
<!-- Thunderbird mail -->
<toolbarpalette id="MailToolbarPalette">
<toolbarbutton id="custom-button-1"/>
</toolbarpalette>
<!-- Thunderbird compose -->
<toolbarpalette id="MsgComposeToolbarPalette">
<toolbarbutton id="custom-button-1"/>
</toolbarpalette>
<!-- Thunderbird address book -->
<toolbarpalette id="AddressBookToolbarPalette">
<toolbarbutton id="custom-button-1"/>
</toolbarpalette>
<!-- Sunbird -->
<toolbarpalette id="calendarToolbarPalette">
<toolbarbutton id="custom-button-1"/>
</toolbarpalette>
<!-- button details -->
<toolbarbutton id="custom-button-1"
label="Custom"
tooltiptext="My custom toolbar button"
oncommand="CustomButton[1]()"
class="toolbarbutton-1 chromeclass-toolbar-additional custombutton"
/>
</overlay>
今、あなたは名前を持つ2つの画像ファイルを挿入する必要があります button-1.jpg そして Icon.jpg それぞれ40×48と48×48の寸法で最良の結果を得る。ただし、幅と長さが48ピクセルを超えない任意のサイズの画像を作成できます。以下に、使用しているボタンの画像を示します– button-1.jpg 画像はそれぞれのサイズ(大小)のツールバーボタン用で、ホバー効果は両方のデフォルト画像のサイズの下に表示されます。 Icon.jpg 画像はメインの拡張機能アイコン画像(Firefox拡張機能ギャラリーに表示されるもの)を指します
button-1.jpg
Icon.jpg
作成したら、5番目のファイルに移動します– button.js。 このJavaScriptファイルは非常に重要です。ボタンの主な機能を定義するためです。機能をテストするようにメッセージを促すサンプルスクリプトを追加するか、必要なことを行うための高度なスクリプトに進むことができます。また、特に要件を満たすために考案された多くのスクリプトがあります。ここでは、シンプルだが便利なスクリプトも確認できます。このガイドは初級レベルのユーザー向けであるため、指定されたWebサイトを開く簡単なブックマークアイテムを作成します。を開く button.js ファイルし、次のコード行を挿入してブックマークボタンを作成します(Firefoxツールバーに表示します)。
CustomButton = {
1: function () {
const url = "https://www.addictivetips.com/"
document
.getElementById("content")
.webNavigation
.loadURI(url, 0, null, null, null)
},
}
これで準備完了です。確認することをお勧めします上記のファイルに挿入したコードを使用して、画像の寸法を再度確認してください。新しく作成した拡張機能をインストールするには、実行中のFirefoxのすべてのインスタンスを閉じてから起動します。すべてがうまくいった場合は、おそらく拡張機能が正常にインストールされたことを示す新しいアドオンインストールプロンプトが表示されます。

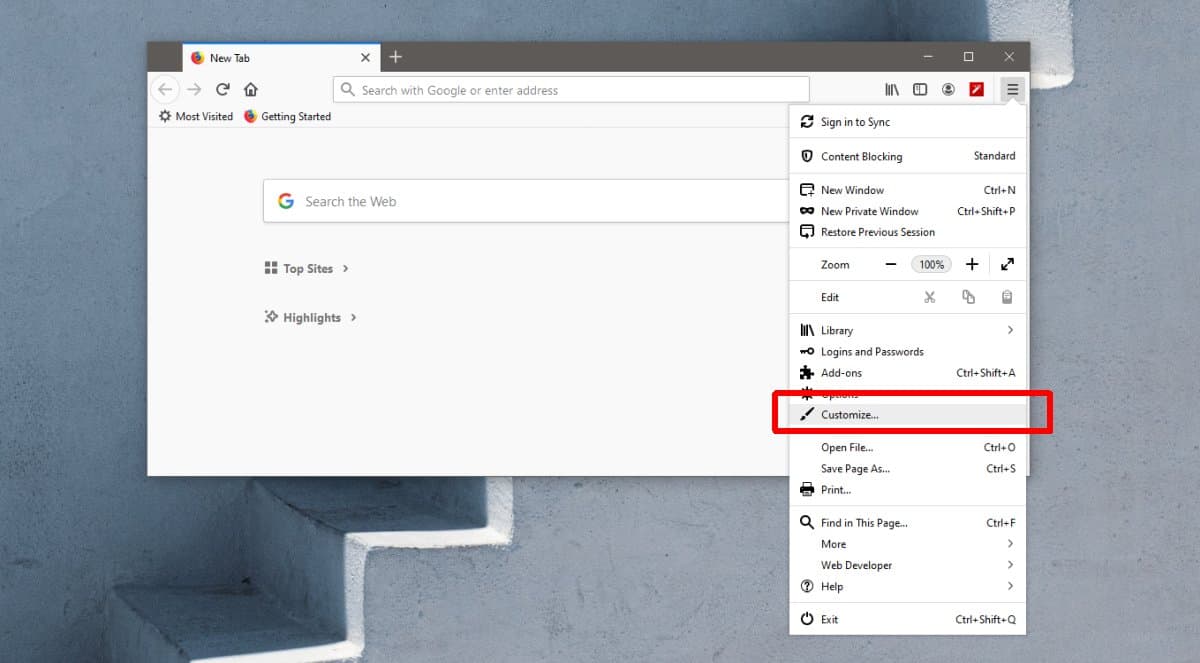
ナビゲーションツールバーに新しく作成されたボタンを表示するには、[表示]メニューの[ツールバー]サブメニューで、[カスタマイズ]をクリックします。

ツールバーのカスタマイズダイアログが表示されます。新しく作成したボタンをナビゲーションツールバーにドラッグする必要があります。挿入したら、好きな場所にドラッグして位置を変更することもできます。

ボタンをクリックして、JavaScriptファイルに挿入された機能を確認します。

結果のボタンの機能はユーザー定義なので、その機能をどれだけ調整できるかはスキル次第です。初心者ユーザーはショートカットを作成し、アプリケーションをリンクし、ブックマークを設計することができますが、平均レベルとエキスパートレベルの中間のユーザーは確かにそれをより活用し、メインJavaScriptファイルに必要な機能を追加できます。


コメント